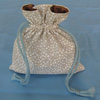

Here is the tutorial from: http://www.threadingmyway.com/2012/09/drawstring-bag-tutorial.html
Thank you PAM
Materials:
- 2 pieces 13 inches x 15 inches (33cm x 38cm) - main colour for the outside of the bag
- 2 pieces 13 inches x 15 inches (33cm x 38cm) - contrast colour for the lining
- 2 pieces 1.5 inches x 12 inches (4cm x 30cm) - main colour for the casing
- 2 pieces 1.5 inches x 42 inches (4cm x 100cm) - main colour for the drawstring cords
Instructions:
All seams are 3/8" (1cm), unless otherwise indicated.
Cut the fabric:
Round the bottom corners of both the outside fabric and the lining, by tracing around a plate.
Sewing the lining:

Sewing the outside:

Attach the lining to the outside of the bag:


Turn the bag right side out:


Casing:


Attach the casing to the bag:


Cords:


Cut the fabric:
Round the bottom corners of both the outside fabric and the lining, by tracing around a plate.
Sewing the lining:
- With right sides together sew each side seam, continuing around the bottom corners.
- Leave a gap of 3" (8cm), across the bottom edge.
- Probably not necessary, but I neaten the edges.
Sewing the outside:
- With right sides together, sew along the long sides and the curved bottom.
- Neaten the edges.
Attach the lining to the outside of the bag:
- Place the bag inside the lining. ie: the right side of the bag is next to the right side of the lining.
- Line up the top edges of the lining and the outside.
- Baste (hand sew) the top edges of the lining and the outside.
- Sew the top edges of the lining and the outside of the bag.
- Finish the seam with a zig zag stitch.
Turn the bag right side out:
- Put your fingers through the hole in the bottom of the lining.
- Gently pull the right side of the bag out through the lining.
- Topstitch the gap in the lining, or you can hand stitch if you would prefer.
Topstitching:
- Push the lining back into the bag.
- Iron the top edge of the bag.
- Topstitch 1/8" (3mm) from the edge, around the top of the bag.
- Turn the short ends under 3/8" (1cm) and stitch
- Fold in half lengthwise so the casing forms a long tube.
- Sew along the long edge.
- Neaten.
- With a safety pin, turn the casing to the right side.
- Press.
- Repeat for the second casing.
- Pin the top edge of the casing 2" (5cm) from the top of the bag.
- Baste (hand sew) the casing and remove the pins.
- Put the bag over the small arm of the machine and stitch the casing to the bag through both the outside and the lining fabric. Sew about 1/8" (3mm) from the long sides of the casing. Leave the short ends unsewn.
There should be a small gap between the casing and the side seam to allow for the cords.
- Fold the short ends in about 3/8" (1cm) and press. (make sure you keep your fingers away from the iron and the steam)
- Fold in half lengthwise and press.
- Open out so you can see the crease.
- Fold each half in to meet the crease and press.
- Fold in half again and press.
- Sew 1/8" (3mm) from the edges.
- Using a safety pin, thread the first cord through the front and back casings.
- Thread the second cord through both casings.
- Knot the ends of each cord.
The cords might be a little hard to pull the first couple of times. If you find this happens, just pull and loosen a couple of times.
You will have noticed that I've used both imperial and metric measurements in this tutorial, as a result of the discussion after my post about inches or centimetres. The conversions are not 100% accurate, as I've rounded up the metric measurements for ease of use. As long as you are consistent, the measurements in this tutorial are not critical, but if you'd like greater accuracy, you can use an online converter.
No comments:
Post a Comment